
How to Adjust Video Recording Quality on iPhone & iPad
Reduce video quality to save storage space without sacrificing too much visual quality.
Or follow the steps below manually
Save massive storage space by choosing the right video recording quality for your needs.
Why This Matters
Video files are the biggest storage hogs on your device:
- 1 minute of 4K 60fps: ~400MB
- 1 minute of 1080p 30fps: ~130MB
- 1 minute of 720p 30fps: ~60MB
Typical savings: 50-75% less storage by optimizing video quality
Step-by-Step Guide
1. Open Settings
Tap Settings on your home screen.
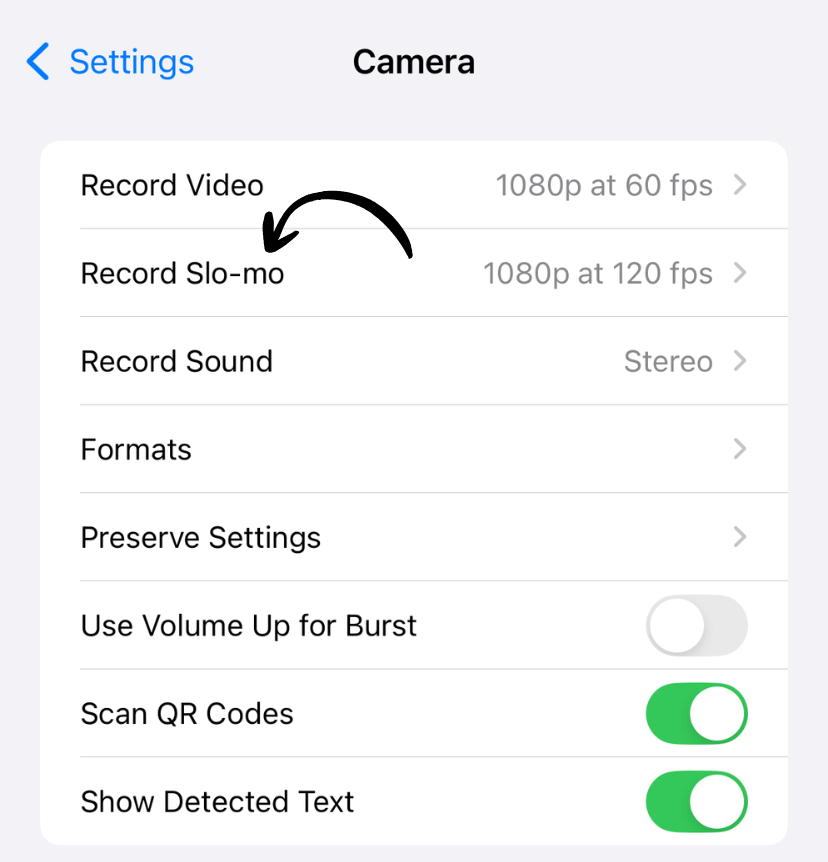
2. Go to Camera
Scroll down and tap Camera.

3. Tap Record Video
Tap Record Video.

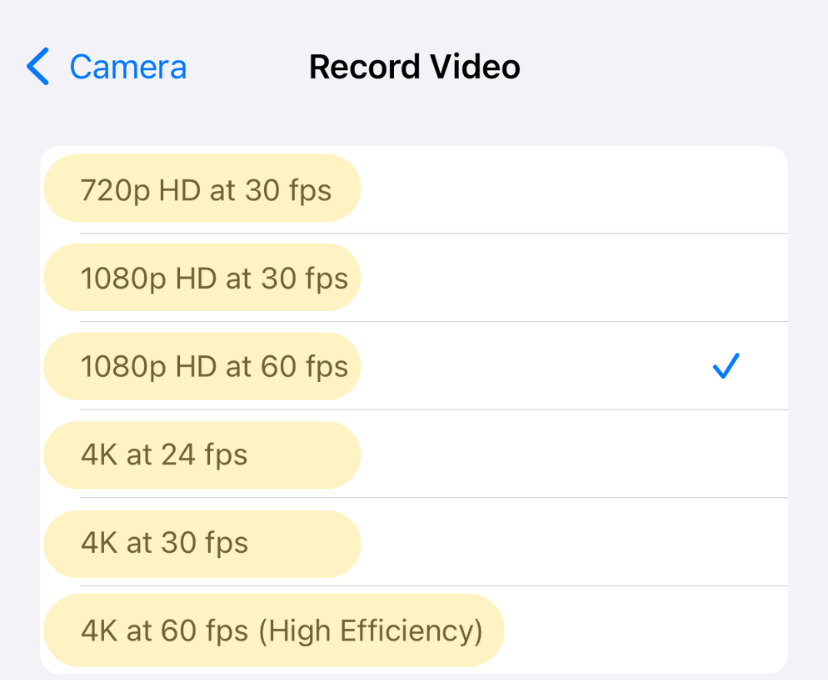
4. Choose Your Video Quality
Select from available options (varies by device):
- 720p HD at 30 fps
- 1080p HD at 30 fps (Recommended for most users)
- 1080p HD at 60 fps
- 4K at 24 fps
- 4K at 30 fps
- 4K at 60 fps
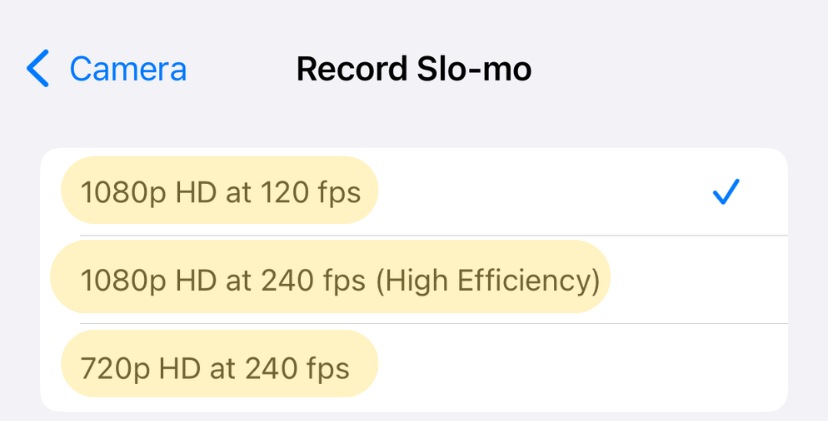
5. Choose Slow-Mo Quality (Optional)
Tap Record Slo-mo and select:
- 1080p at 120 fps (Recommended)
- 1080p at 240 fps
- 4K at 120 fps (iPhone 13 Pro and later)
✅ Done! New videos will use your selected quality.
Which Quality Should You Choose?
For Most Users: 1080p at 30fps
Best for:
- Everyday videos
- Sharing on social media
- Watching on phones and tablets
- Balancing quality and storage
Storage: ~130MB per minute
For Social Media: 1080p at 60fps
Best for:
- Smooth motion videos
- Action shots
- Sports and fast movement
- Better slow-motion potential
Storage: ~200MB per minute
For Professionals: 4K at 30fps or 60fps
Best for:
- Professional video production
- Large screen viewing
- Maximum detail capture
- Future-proofing
Storage:
- 4K 30fps: ~350MB per minute
- 4K 60fps: ~400MB per minute
For Maximum Storage Savings: 720p at 30fps
Best for:
- Very limited storage
- Long recordings
- Basic video needs
Storage: ~60MB per minute Quality: Noticeably lower on larger screens
Storage Comparison
10 minutes of video:
- 720p 30fps: ~600MB
- 1080p 30fps: ~1.3GB
- 1080p 60fps: ~2GB
- 4K 30fps: ~3.5GB
- 4K 60fps: ~4GB
1 hour of video:
- 720p 30fps: ~3.6GB
- 1080p 30fps: ~7.8GB
- 1080p 60fps: ~12GB
- 4K 30fps: ~21GB
- 4K 60fps: ~24GB
Quality vs File Size Trade-offs
Visual quality differences:
- 720p vs 1080p: Noticeable on screens larger than phones
- 1080p vs 4K: Visible on 4K TVs and monitors
- 30fps vs 60fps: Smoother motion at 60fps
When higher quality matters:
- Professional use
- Large screen viewing
- Video editing
- Archival/preservation
When lower quality is fine:
- Quick clips
- Social media (apps compress anyway)
- Video calls
- Everyday memories
Pro Tips
Mix and Match
You can change quality anytime:
- Before important events: Switch to 4K
- For everyday clips: Use 1080p
- For long recordings: Switch to 720p
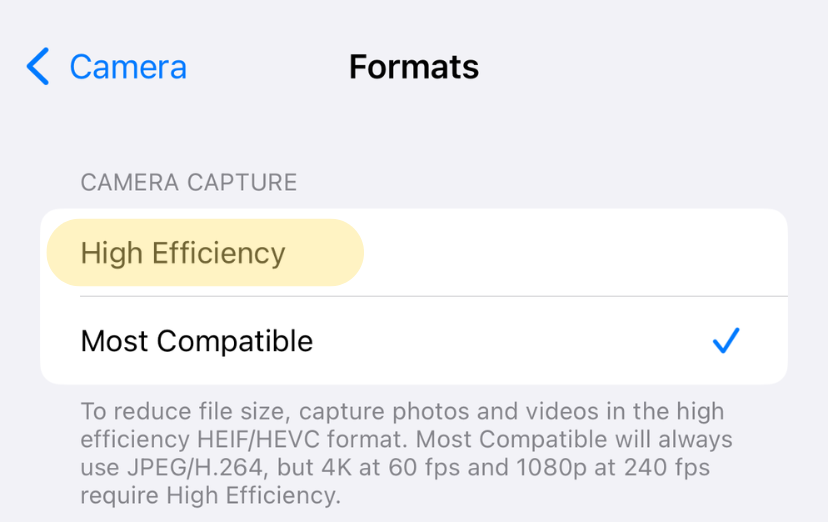
Use High Efficiency Format
Combine with HEVC (High Efficiency) format for 40% additional savings:
- Settings > Camera > Formats > High Efficiency
Cloud Storage
If using iCloud Photos with “Optimize iPhone Storage”:
- Record at higher quality
- Let iCloud keep originals
- Device stores smaller versions
Our Recommendation
Best balance for most users:
- Video: 1080p at 30fps
- Slow-mo: 1080p at 120fps
- Format: High Efficiency (HEVC)
This provides excellent quality while using 3-4x less storage than 4K.
Works on iPhone and iPad
Video quality options vary by device. Newer models offer more options including 4K 60fps and higher frame rate slow-motion. Check your Camera settings to see available options.
Related Guides
Clean Up Duplicate Photos Automatically
After optimizing your settings, use Dedupify to find and remove duplicate photos.
Download Dedupify